Cheyenne, The Healing Wolf
 I first heard about Cheyenne from Bonnie, a friend of mine who told me about her wonderful experience with Cheyenne. She told me about this special wolf that is friendly to people and if she bonds with you, you will forever have a tale to tell of the wolf that licked your face. Cheyenne has a special gift. She has been able to detect serious illnesses in people. I first heard about Cheyenne from Bonnie, a friend of mine who told me about her wonderful experience with Cheyenne. She told me about this special wolf that is friendly to people and if she bonds with you, you will forever have a tale to tell of the wolf that licked your face. Cheyenne has a special gift. She has been able to detect serious illnesses in people.
To date, she has detected cancer in about 20 people. She has met 19,000 people and has bonded with 1,476 of them. I was honored to be number 1,412! Generally she bonds with females more so than males. However, if she detects an illness in you, whether male or female, she will approach and lick the area where the illness lies. I was intrigued and decided to make an appointment with her “Dad” Mark Johnson to go see Cheyenne in Guffey, CO where she lives. Mark Johnson runs the Rocky Mountain Wildlife Foundation, a 501-c-3 Non-Profit Corporation. He cares for a number of wolves. A new arrival is apparently very affectionate and loves to gives kisses.
Date: 06/02/05
Source: Sofia M. Pico-Ambrosio, LMT, RM
Wolves have the misfortune of being misunderstood. In Europe, the wolf was so feared by men that it was hunted to virtual extinction. Throughout history and literature, the wolf has been demonized and portrayed as a blood thirsty monster. In public opinion and literature, this can be seen starting during our early years with tales such as The Little Red Riding Hood. The Big Bad Wolf simply doesn’t exist. In fact, there is not one documented case of a wolf killing a human.
Actually wolves are afraid of humans and shy away from us, and rightly so, humans have killed over one million wolves. Mostly they have been killed because of unfounded fears. Colorado’s last wolf dissapeared 60 years ago. In the early 20th century, wolves roamed freely throughout the lower contiguous 48 states. Only 12 states now have free roaming wolves. Wolves have an important part in the ecosystem.
The wolf is at the top of the food chain. In the wild, it feeds on animals such as deer, elk, moose, buffalo, antelope, big horn sheep and even coyotes. The coyote preys on smaller animals such as squirrel, rabbits, gophers, mice, and they will also scavenge carcasses of prey that the wolf has left behind. When the wolf is removed, the population of coyotes and the wolf’s other prey animals increases. These animals then compete for vegetation and tend to strip the highlands as they search for more food. The aspen and willow trees are then eaten and this major food source of the beaver becomes scarce.
The increase of coyote then takes prey away from other animals such as eagle, hawk, owls, foxes, causing these species to then decline. The coyote also loves to prey on our beloved cats and dogs. Several years ago wolves were reintroduced into Yellowstone Park and in Idaho.
According to Defenders.org: The wolf reintroduction program in Yellowstone National Park and central Idaho has just marked its fifth anniversary. The return of the wolf has helped restore ecological processes and dramatically enriched the web of life in the area. According to Ed Bangs, northern Rockies gray wolf recovery coordinator for the U.S. Fish and Wildlife Service, the program "has exceeded all our hopes. [The wolves] are doing great." The wolf is a majestic and beautiful animal. The Native American People recognized it’s wisdom and had a strong bond with the wolf. Even before the dog became humans’ best friend, the wolf was the Native Americans’ loyal friend. The two hunted together and lived in harmony.
This reminds me of a show I saw some time ago on PAX TV. A young Native American man from Minnesota recalled a winter when he got stuck in a freezing winter storm. It was so cold his truck even stopped. Fearing that he and his girlfriend, who was also in the truck, would not make it through the night, he decided to run to a house they had passed about a mile away to use the telephone. It was difficult for him to get to this house. It was so cold he could not feel his limbs. Unfortunately, the person in the house did not allow him to use the phone and closed the door on him. He now had to get back to the truck. As he struggled to get back, he stumbled time and time again. He then noticed that he was being followed by a large animal and feared that it was going to have him as a meal. He was in and out of consciousness and finally collapsed. The animal approached and licked his face to awaken him. It was a large wolf. The warmth from the wolf’s fur and breath revived the young man. He was able to put his arms around the wolf, get some body heat, and regain his consciousness. The wolf left and the young man got up and continued until he got back to his truck. They were safe and were rescued the following morning.
Cheyenne was raised by humans since she was a puppy. She was raised in a tourist town and had contact with lots of people. Now she lives in the mountains, away from people. She shares her pen with her good friend “wiggle butt”. He is an adorable male dog who loves people. Before arriving, Mark asked me to bring a small article of clothing that I would not care about losing. He said Cheyenne enjoys “stealing” your sock, glove, etc.
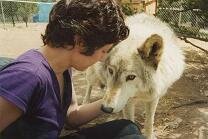
When you arrive, Mark greets you and tells you some things about Cheyenne. Then you walk into her pen and sit with Mark by the entrance and wait. If Cheyenne trusts you, she will come up and lick your hand or face. If you brought a sock or other piece of clothing for her, she will come up and take it from you. I had my old sock sticking out of my pocket. She knew it was for her and gently tugged at it until it was hers. She then walked around with it in her mouth and then stopped at a corner of her pen. She began to dig a hole with the sock still in her mouth. I was joking,” Does it smell that bad”? Mark then explained that she was trying to tell me to bury my past. This was an old sock. One that I had owned and worn during an unhappy time of my life. Apparently these emotions were embedded in the sock and she could feel it. It all made sense.
To be accepted and licked and nuzzled by a 165 pound huge wolf is an exhilarating feeling. Even if she shies away from you, the sheer experience of being that close to such a beautiful animal is exciting. Mark accepts donations. Taking care of so many wolves is a very costly operation so I was happy to give a tax deductible donation. Be sure to visit Cheyenne, Wiggle-Butt, and the other wolves this spring or summer.
The Rocky Mountain Wildlife Foundation website has more information, pictures and over 60 articles that have been written about Cheyenne: www.visionswest-art.com .
For information on wolf visits, volunteer work, or donations contact:
Mark Wm. Johnson
0394 Horse Thief Gulch Rd.
P.O. Box 215
Guffey, CO 80820
Email:
Cell Phone
Resources: www.visionswest-art.com - www.wolfeducation.org
|